
A Huawei USB GSM modem, an Orange Pi Zero and an open-source Asterisk module called chan_dongle — that is all you need to turn a prepaid SIM card into a fully functional VoIP gateway. Pair it with an IAX trunk to callagent.pro and every incoming GSM call is answered by an AI voice agent that qualifies leads, books appointments and handles enquiries around the clock. Outbound calls work too — trigger them from the callagent.pro dashboard, via the API webhook, or from any automation tool like Zapier, n8n or Make.
This guide covers the entire process from scratch. The fastest route is Docker — three commands and you are up and running. For those who prefer compiling from source, the full manual installation steps are included as well. Either way, every config file is provided so you can copy-paste and be done in minutes.
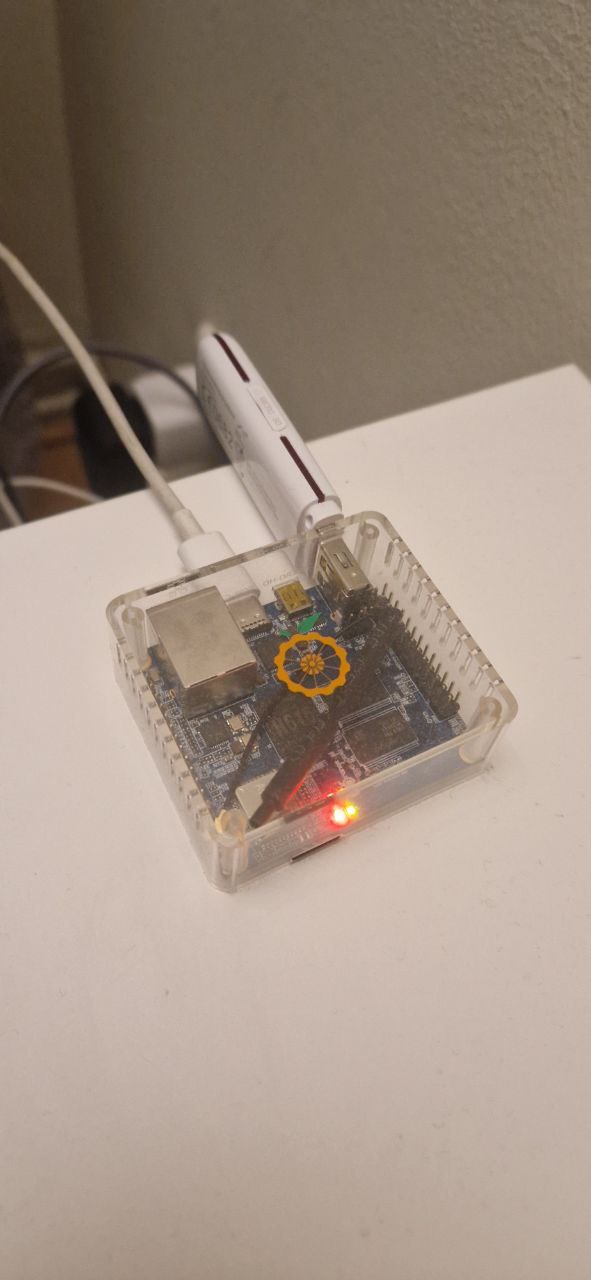
An Orange Pi Zero — a $15 single-board computer powerful enough to run Asterisk with chan_dongle.
What You Need
- An Orange Pi Zero (or any Debian/Ubuntu ARM board — Raspberry Pi works too)
- A Huawei USB GSM modem — E1550, E173, E169, E153, E175X or similar (see compatibility list below)
- A SIM card with PIN deactivated and an active mobile plan
- A power supply rated at least 1.2A (or a powered USB hub if running multiple dongles)
- A free account on callagent.pro
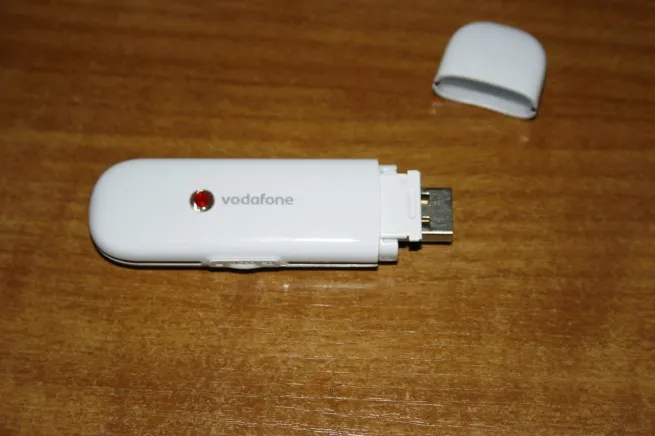
A Huawei E1550 USB modem — one of the most reliable dongles for chan_dongle.
Important: Before inserting the SIM, deactivate the PIN on your card using any phone. Some Huawei modems also need voice-calling capability enabled and the latest firmware — details on the chan_dongle wiki.
Compatible Huawei Modems
Chan_dongle supports a wide range of Huawei USB modems. The following have been reported working:
Known problematic: E150, E1752, E303C, E352, K3520-z. Check the full compatibility list if your model is not listed above.
Quick Start with Docker (Recommended)
The fastest way to get up and running is with Docker. Three commands and you have a fully working Asterisk + chan_dongle setup — no compiling, no dependency headaches.
No Docker yet? If you are on Armbian and Docker is not installed, run this one-liner first:
curl -fsSL https://raw.githubusercontent.com/pulpoff/asterisk-chan-dongle/master/docker/install-docker.sh | sudo bashStep 1 — Download configuration files
curl -O https://raw.githubusercontent.com/pulpoff/asterisk-chan-dongle/master/docker-compose.yml
curl -o .env https://raw.githubusercontent.com/pulpoff/asterisk-chan-dongle/master/docker/.env.example
Step 2 — Set your callagent.pro credentials
Open the .env file and fill in the trunk credentials from your callagent.pro dashboard (see Step 5 below for where to find them):
| Variable | Required | Default | Description |
|---|---|---|---|
TRUNK_USER | Yes | — | Your IAX/SIP account username (e.g. 200xxx) |
TRUNK_PASS | Yes | — | Your IAX/SIP account password |
TRUNK_HOST | Yes | — | PBX server address (e.g. callagent.pro) |
TRUNK_PROTO | No | iax | Protocol: iax, sip or pjsip |
TRUNK_PORT | No | 4569 / 5060 | Connection port (auto-set by protocol) |
DONGLE_CONTEXT | No | from-dongle | Dialplan context for inbound GSM calls |
Step 3 — Launch
docker compose up -dThat's it. The container auto-restarts on reboot, detects your USB modem, and registers with callagent.pro. Verify everything is working:
# Check container logs
docker logs asterisk-dongle

# Open the Asterisk CLI
docker exec -it asterisk-dongle asterisk -rvvv

# Check dongle status
docker exec -it asterisk-dongle asterisk -rx "dongle show devices"
You should see your dongle in Free state and the IAX trunk registered. Skip ahead to Step 5 to set up your AI agent on callagent.pro, or continue reading for the manual installation method.
Docker handles everything: Asterisk 20, chan_dongle compilation, modem detection, IAX/SIP trunk config and dialplan are all set up automatically inside the container. The environment variables above are all you need to configure.
Alternative: Manual Installation from Source
Click to expand manual compile & install steps
Install Asterisk 20 from Source
Compile Asterisk 20 LTS from source so that chan_dongle can build against its headers. Start by installing the build dependencies:
sudo apt update && sudo apt upgrade -y

sudo apt install -y build-essential git curl wget \
  libncurses5-dev libssl-dev libxml2-dev libsqlite3-dev \
  uuid-dev libjansson-dev libedit-dev pkg-config \
  autoconf automake libtool usb-modeswitch
Download and extract Asterisk 20:
cd /usr/src
sudo wget https://downloads.asterisk.org/pub/telephony/asterisk/asterisk-20-current.tar.gz
sudo tar xzf asterisk-20-current.tar.gz
cd asterisk-20.*/
Install prerequisites, configure, compile and install:
# Install any missing prerequisites
sudo contrib/scripts/install_prereq install

# Configure (disable binary modules we don't need on ARM)
./configure --with-jansson-bundled

# Select modules (defaults are fine for our setup)
make menuselect.makeopts
menuselect/menuselect --enable chan_sip menuselect.makeopts

# Compile and install
make -j$(nproc)
sudo make install
sudo make samples
sudo make config
sudo ldconfig
Start Asterisk and verify it runs:
sudo systemctl start asterisk
sudo systemctl enable asterisk
asterisk -rx "core show version"
Compile and Install chan_dongle
The original chan_dongle repository is no longer maintained for newer Asterisk versions. Use this fork which includes patches for Asterisk 20:
cd /usr/src
sudo git clone https://github.com/pulpoff/asterisk-chan-dongle.git
cd asterisk-chan-dongle/
Configure and compile against your Asterisk installation:
./bootstrap
./configure --with-astversion=20
make
sudo make install
Verify the module is installed:
ls -la /usr/lib/asterisk/modules/chan_dongle.soLoad the module in Asterisk:
asterisk -rx "module load chan_dongle.so"
asterisk -rx "dongle show version"
Step 3 — Plug In the Modem and Verify Detection
Insert your SIM card (PIN deactivated) into the Huawei modem and plug it into the Orange Pi's USB port. Wait a few seconds, then check:
# Check USB detection
lsusb | grep -i huawei

# Check ttyUSB devices appeared
ls -l /dev/ttyUSB*
You should see two devices, typically /dev/ttyUSB0 and /dev/ttyUSB1 (or ttyUSB1 and ttyUSB2). If you only see one or none, the modem may still be in CD-ROM mode. usb_modeswitch (which we installed earlier) should handle this automatically, but if not, reboot the Orange Pi:
sudo rebootAfter confirming the ttyUSB devices, check that Asterisk sees the dongle:
asterisk -rx "dongle show devices"You should see output similar to:
ID           Group State      RSSI Mode Submode Provider Name  Model      Firmware          IMEI             IMSI             Number
dongle0      0     Free       18   0    0       YourProvider   E1550      11.608.xx.xx.xx   35xxxxxxxxxxxx   26xxxxxxxxxxx    +49xxxxxxxxxx
Tip: If the dongle shows State: Not connected, check the audio and data ports in dongle.conf below. Some modems use ttyUSB0/ttyUSB1 instead of ttyUSB1/ttyUSB2.
Step 4 — Configure dongle.conf
Create or edit /etc/asterisk/dongle.conf:
[general]
interval=15
smsdb=/var/lib/asterisk/smsdb
csmsttl=600

[defaults]
context=from-dongle
group=0
rxgain=3
txgain=3
autodeletesms=yes
resetdongle=yes
u2diag=-1
usecallingpres=yes
callingpres=allowed_passed_screen
disablesms=no
language=en
callwaiting=auto
disable=no
initstate=start
exten=+12345678900     ; Replace with the phone number of your SIM

[dongle0]
audio=/dev/ttyUSB1     ; Audio channel (adjust if different)
data=/dev/ttyUSB2      ; Data/AT channel (adjust if different)
; imei=                ; Uncomment to bind by IMEI
; imsi=                ; Uncomment to bind by IMSI
Multiple dongles? Simply add [dongle1], [dongle2], etc. with the corresponding audio and data ports. Use a powered USB hub when running more than one modem.

Step 5 — Create Your AI Agent at callagent.pro
Sign up for a free account at callagent.pro and create a new AI voice agent. Configure the language, voice, and provide instructions about your business — what the agent should say, what questions to ask callers, and how to handle appointments or bookings.
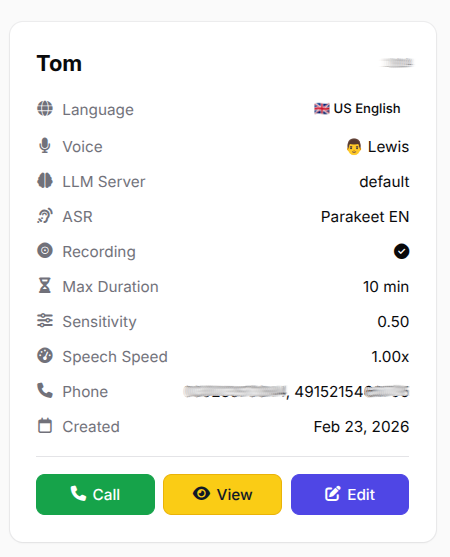
Your agent card in the callagent.pro dashboard — configure language, voice and behaviour.
Navigate to the SIP/IAX section in your dashboard. You will find your IAX account with a username and a password. These are the YOUR_IAX_USERNAME and YOUR_IAX_PASSWORD values Asterisk will use to register with callagent.pro.
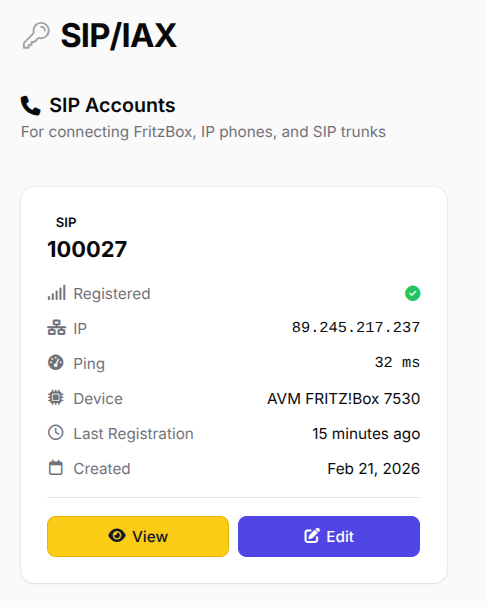
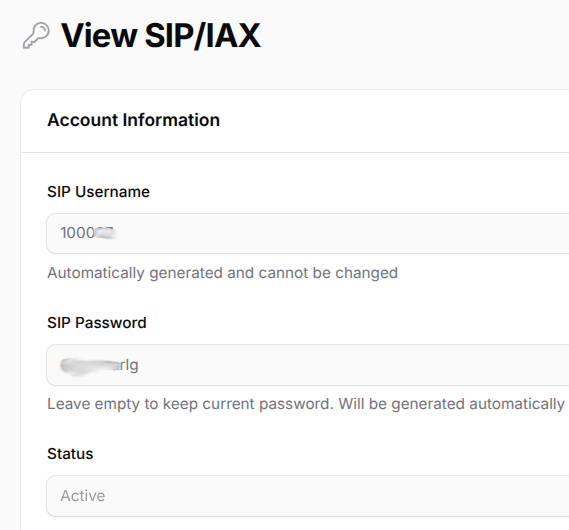
Left: Your IAX account showing registered status. Right: The IAX username and password you need for iax.conf (YOUR_IAX_USERNAME / YOUR_IAX_PASSWORD).
Step 6 — Configure iax.conf (IAX Trunk to callagent.pro)
We use the IAX2 protocol to connect Asterisk to callagent.pro. IAX is ideal for this setup because it works well behind NAT, uses a single UDP port (4569), and has lower overhead than SIP. Edit /etc/asterisk/iax.conf:
[general]
bindaddr=0.0.0.0
bindport=4569
iaxcompat=no
autokill=yes

; Codec defaults
disallow=all
allow=ulaw
allow=alaw

; Registration — replace with your IAX credentials
register => YOUR_IAX_USERNAME:YOUR_IAX_PASSWORD@callagent.pro

bandwidth=high
jitterbuffer=no
language=en

; ── Trunk definition ──
[callagent]
type=friend
host=callagent.pro
secret=YOUR_IAX_PASSWORD
context=from-callagent
qualify=yes
disallow=all
allow=ulaw
allow=alaw
auth=md5
requirecalltoken=no
trunk=no
Replace YOUR_IAX_USERNAME and YOUR_IAX_PASSWORD with the credentials from your callagent.pro dashboard. After saving, reload the IAX module:
asterisk -rx "iax2 reload"
asterisk -rx "iax2 show peers"
You should see your callagent trunk with OK status and a ping time:
Name/Username    Host                 Mask             Port  Status     Description
callagent        callagent.pro        (S)  255.255.255.255  4569  OK (32 ms)
Step 7 — Configure extensions.conf (Dialplan)
The dialplan routes calls in both directions: incoming GSM calls go to the AI agent via IAX, and outbound calls from the AI agent go out through the dongle to the GSM network. Edit /etc/asterisk/extensions.conf:
[general]
static=yes
writeprotect=yes
autofallthrough=yes

; ═══════════════════════════════════════════════
; FROM-CALLAGENT — Outbound calls from callagent.pro
; Routes through the GSM dongle to mobile network
; ═══════════════════════════════════════════════
[from-callagent]

exten => _+.,1,NoOp(=== Outbound dongle call to ${EXTEN} ===)
 same => n,Set(TIMEOUT(absolute)=1800)
 same => n,Dial(Dongle/dongle0/${EXTEN},60,Tt)
 same => n,NoOp(Dial result: ${DIALSTATUS})
 same => n,Hangup()

exten => _X.,1,NoOp(=== Outbound dongle call to ${EXTEN} ===)
 same => n,Set(TIMEOUT(absolute)=1800)
 same => n,Dial(Dongle/dongle0/${EXTEN},60,Tt)
 same => n,NoOp(Dial result: ${DIALSTATUS})
 same => n,Hangup()

; ═══════════════════════════════════════════════
; FROM-DONGLE — Inbound calls from the GSM network
; Forwards to callagent.pro for AI agent routing
; ═══════════════════════════════════════════════
[from-dongle]

exten => _+.,1,Answer()
 same => n,Set(IAXVAR(REAL_CALLER)=${CALLERID(num)})
 same => n,Set(MOBILE=${SHELL(asterisk -rx 'dongle show devices' | grep dongle0 | awk '{print $NF}')})
 same => n,Set(IAXVAR(REAL_CALLED)=${MOBILE})
 same => n,Set(TIMEOUT(absolute)=1800)
 same => n,Dial(IAX2/callagent/${MOBILE},30,Tt)
 same => n,Hangup()

exten => _X.,1,Answer()
 same => n,Set(IAXVAR(REAL_CALLER)=${CALLERID(num)})
 same => n,Set(MOBILE=${SHELL(asterisk -rx 'dongle show devices' | grep dongle0 | awk '{print $NF}')})
 same => n,Set(IAXVAR(REAL_CALLED)=${MOBILE})
 same => n,Set(TIMEOUT(absolute)=1800)
 same => n,Dial(IAX2/callagent/${MOBILE},30,Tt)
 same => n,Hangup()

exten => s,1,Answer()
 same => n,Set(IAXVAR(REAL_CALLER)=${CALLERID(num)})
 same => n,Set(MOBILE=${SHELL(asterisk -rx 'dongle show devices' | grep dongle0 | awk '{print $NF}')})
 same => n,Set(IAXVAR(REAL_CALLED)=${MOBILE})
 same => n,Set(TIMEOUT(absolute)=1800)
 same => n,Dial(IAX2/callagent/${MOBILE},30,Tt)
 same => n,Hangup()
Reload the dialplan:
asterisk -rx "dialplan reload"Step 8 — Test Your Calls
Everything is wired up. Let's test both directions.
Test inbound (GSM → AI Agent)
Call the SIM card number from any phone. You should see the call appear in the Asterisk CLI:
asterisk -rvvvWatch for lines like:
[from-dongle] Incoming GSM call from +491701234567
-- IAX2/callagent-12345 answered
-- Channel bridged
Your AI agent on callagent.pro will answer the call and start the conversation.
Test outbound (AI Agent → GSM)
From the Asterisk CLI, you can manually place an outbound call through the dongle:
asterisk -rx "dongle cmd dongle0 ATD+491701234567;"Or use the callagent.pro API to trigger an outbound call (see the Webhook section below).
Verify on callagent.pro: After a successful test call, go to your dashboard. The phone number will appear in the Phone Numbers section, and the IAX account will show as Registered.
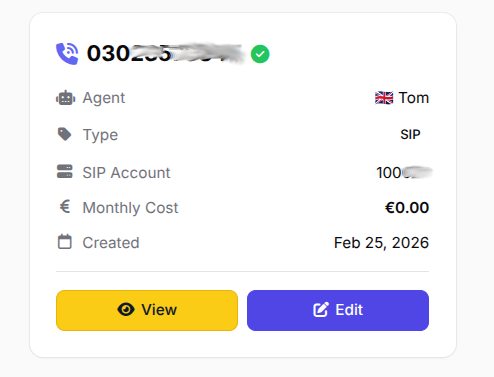
Your GSM phone number linked to the AI agent in the callagent.pro dashboard.
Trigger Calls via Webhook API
callagent.pro provides a simple REST API to trigger outbound calls programmatically. This is perfect for integrating with Zapier, n8n, Make (Integromat), WordPress, or any custom application.
Endpoint
POST https://callagent.pro/api/callParameters
| Parameter | Required | Description |
|---|---|---|
api_key | Yes | Your API key from the dashboard |
phone_number | Yes | Number to call (e.g. +491701234567) |
agent_id | Yes | ID of the AI agent to use |
max_duration | No | Max call length in minutes (default: 10, max: 120) |
context | No | Extra context for the agent (e.g. caller name, ticket number) |
Example cURL request
curl -X POST "https://callagent.pro/api/call" \
  -d "api_key=YOUR_API_KEY" \
  -d "phone_number=+491701234567" \
  -d "agent_id=1001" \
  -d "max_duration=10" \
  -d "context=Customer: John Smith, Ticket: #4521"
You can use this URL as a webhook in virtually any tool:
- Zapier: Add a "Webhooks by Zapier" action → POST to
https://callagent.pro/api/call - n8n: Use an HTTP Request node with method POST and the URL above
- WordPress: Call the endpoint from a form submission hook or WooCommerce order event
- Make (Integromat): Use the HTTP module to send a POST request
- Custom app: Any language — just POST to the endpoint with your API key
Post-call webhook (callback)
callagent.pro can also send a POST callback to your own URL after every call completes. Configure this in your agent settings by providing a Webhook URL. The payload includes call details, duration, transcription and any extracted variables — perfect for pushing call results into your CRM, database, or automation pipeline.
Troubleshooting
Modem not detected (no /dev/ttyUSB devices)
- Make sure
usb-modeswitchis installed:sudo apt install usb-modeswitch - Unplug the modem, wait 5 seconds, plug back in. Some modems need a full reboot after the first plug-in.
- Try a different USB port or cable — some extension cables cause detection issues.
Dongle disconnects during calls
- This is almost always a power issue. Use a power supply rated at least 1.2A, or use a powered USB hub.
- Connect the modem directly without a USB extension cable.
- If using a powered hub, try a different one — some hubs don't deliver consistent power.
IAX trunk shows UNREACHABLE
- Check your credentials in
iax.conf— username and password must match your callagent.pro dashboard exactly. - Make sure UDP port 4569 is not blocked by a firewall:
sudo ufw allow 4569/udp - Test connectivity:
nc -vzu callagent.pro 4569
Calls connect but no audio
- Increase
rxgainandtxgainindongle.conf(try values between 3 and 10). - Make sure
allow=alawandallow=ulaware set iniax.conf. - Check that
encryption=yesis set on both ends.
Why This Setup Works
- Local mobile number: Customers call a regular mobile number — not a VoIP number that might look suspicious
- 24/7 availability: The AI agent never sleeps, never takes a break, never misses a call
- Instant qualification: Leads are qualified in real time while they are still interested
- Dirt cheap: An Orange Pi Zero costs ~$15, a used Huawei dongle ~$5, and a prepaid SIM ~$5/month
- Scalable: Need more numbers? Add more dongles, add more SIMs
- Works anywhere: Plug it in anywhere you have GSM signal and internet — no landline required

Scale it up! Multiple GSM modems working with Asterisk chan_dongle at customer testing lab.

Summary
- Download
docker-compose.ymland.envfrom github.com/pulpoff/asterisk-chan-dongle - Plug in a Huawei GSM dongle with a SIM card
- Create an AI agent at callagent.pro and grab your IAX credentials
- Fill in your credentials in the
.envfile - Run
docker compose up -dand test inbound + outbound calls - Optionally trigger calls from Zapier, n8n, WordPress or any webhook
Every call to your mobile number is now handled by an AI agent that qualifies leads, collects information and books appointments — all for the cost of a SIM card and a USB dongle.
Ready to build your GSM VoIP gateway?
Create your free AI voice agent, grab your IAX credentials, and start handling calls automatically.
Get Started Free